
40–60% of New England homes lack ductwork. Ductless mini-splits are the ideal solution — no invasive duct installation, room-by-room control, and cold-climate models that work down to -13°F. Here are the best systems for old NE homes.
Home Electrification Experts — Full-Service Design to Install, 9 States
Avg Home Age
75–150 yrs
pre-1950 stock
Typical Heat Loss
60K–90K BTU
much higher than modern
Zones Needed
3–5
for whole-home comfort
Avg Installed Cost
$14K–$22K
multi-zone systems
Why Old New England Homes Are Different
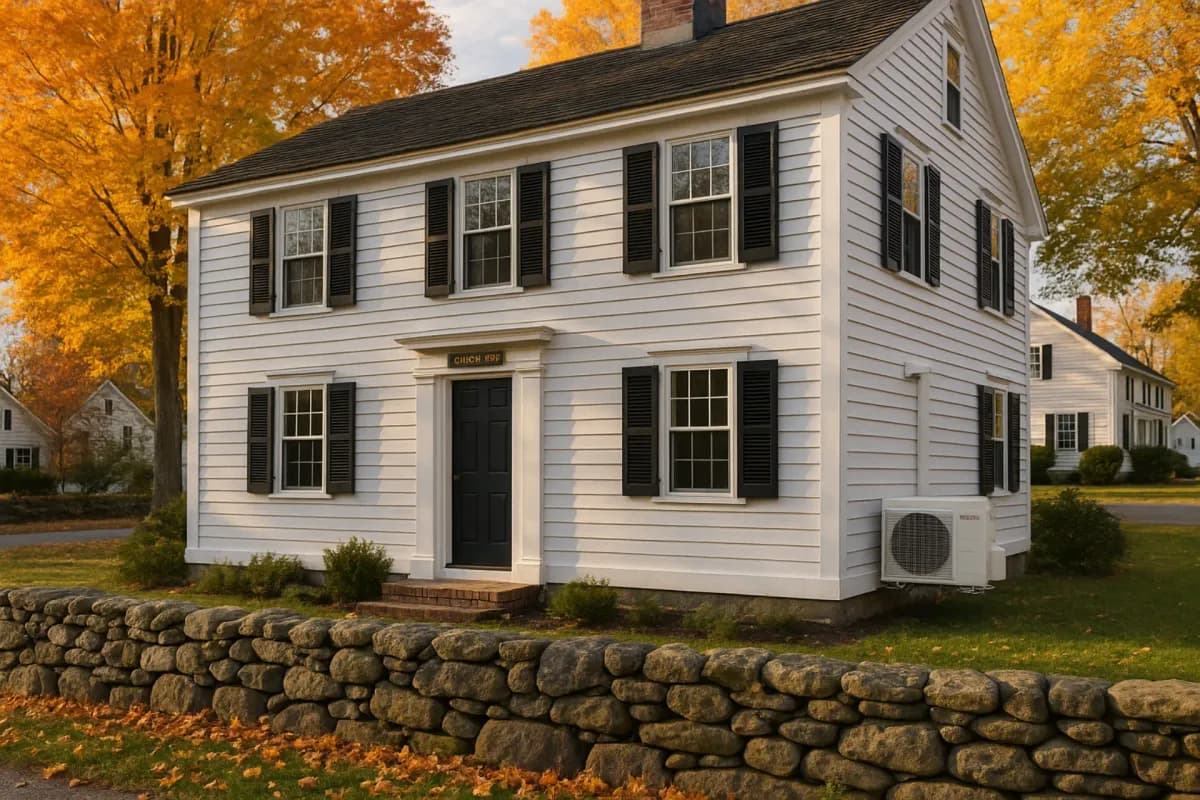
New England has one of the oldest housing stocks in the United States. A significant portion of homes in Massachusetts, Connecticut, Rhode Island, Vermont, New Hampshire, and Maine were built before 1950 — many before 1900. These homes were constructed with balloon framing, plaster-and-lath walls, minimal or zero insulation, and no provisions for ductwork. They were designed around cast-iron radiators, coal stoves, and later, oil-fired boilers. They were never intended to have forced-air systems of any kind.
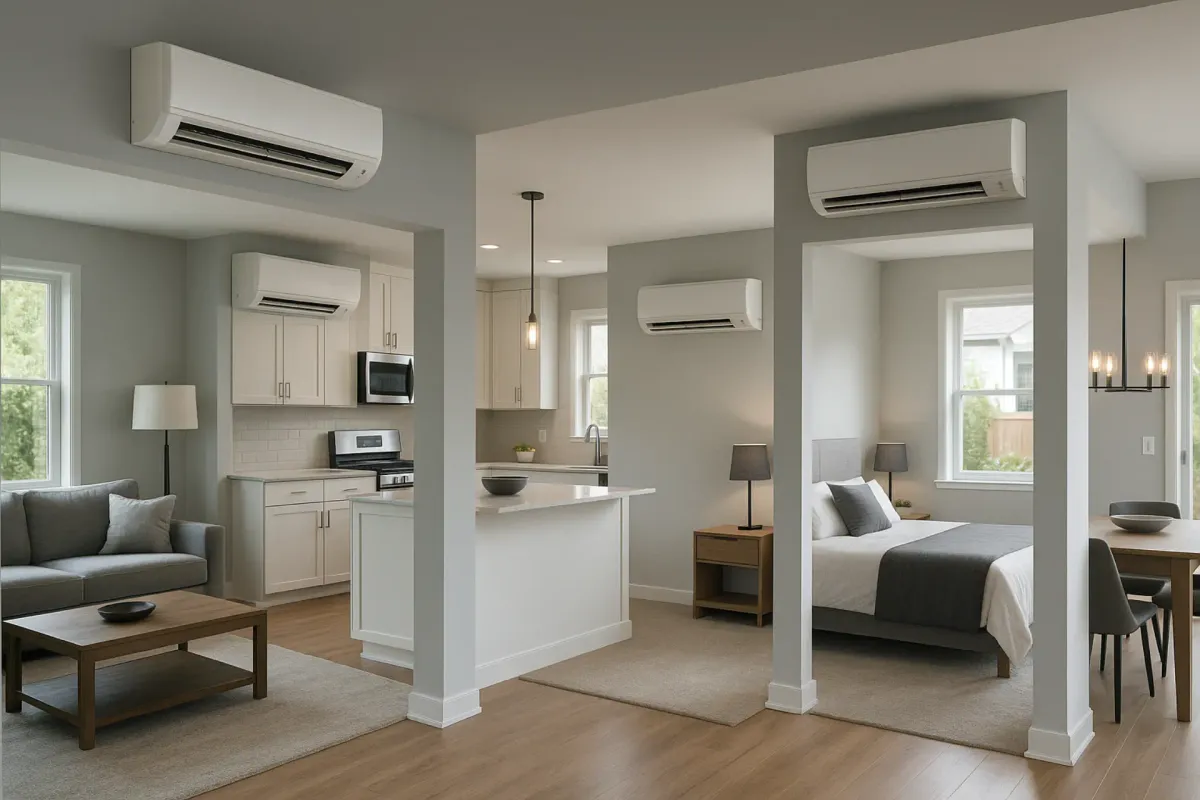
This construction heritage makes these homes both excellent candidates for ductless heat pumps and uniquely challenging to heat efficiently. The lack of existing ductwork means you cannot install a conventional central ducted heat pump without major construction. But the room-by-room nature of the original heating system (radiators in each room) maps perfectly onto a multi-zone ductless system where each room gets its own independently controlled indoor head.
Old New England homes also carry distinctive challenges: balloon framing creates hidden air channels from basement to attic, plaster walls are difficult to insulate without destruction, and many homes sit in historic districts with exterior modification restrictions. Understanding these factors is essential to designing a ductless system that actually performs well in a 100-year-old house.
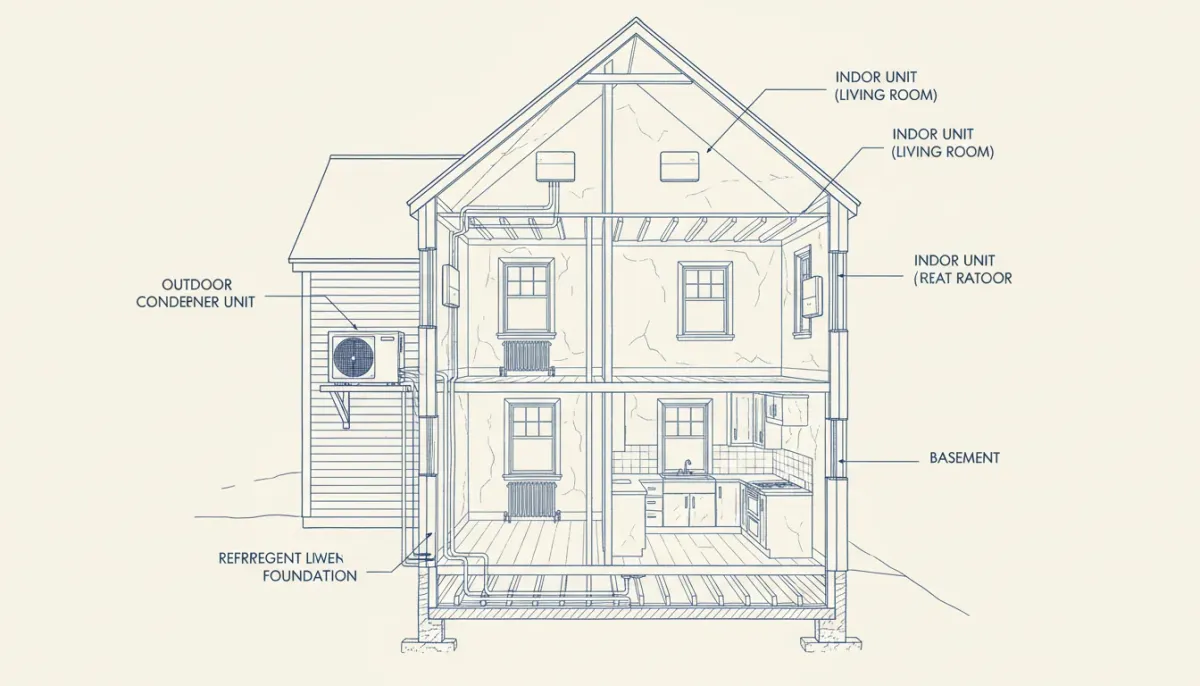
Typical ductless mini-split installation in a pre-1950 Cape Cod: outdoor condenser on elevated bracket, refrigerant lines routed through the basement, and wall-mounted heads in each zone.
The 4 Challenges of Heating Old Homes
Before choosing equipment, you need to understand what makes an old home so much harder to heat than a modern one. These four challenges drive every system design decision.
High Heat Loss
Pre-1950 homes lose 40-60% more heat than modern code-built homes of the same size. Balloon framing with no insulation, single-pane windows, and unweatherstripped doors create a massive thermal load. A 2,000-sqft old Colonial may need 70,000-90,000 BTU of heating capacity — the same as a modern 3,500-sqft home.
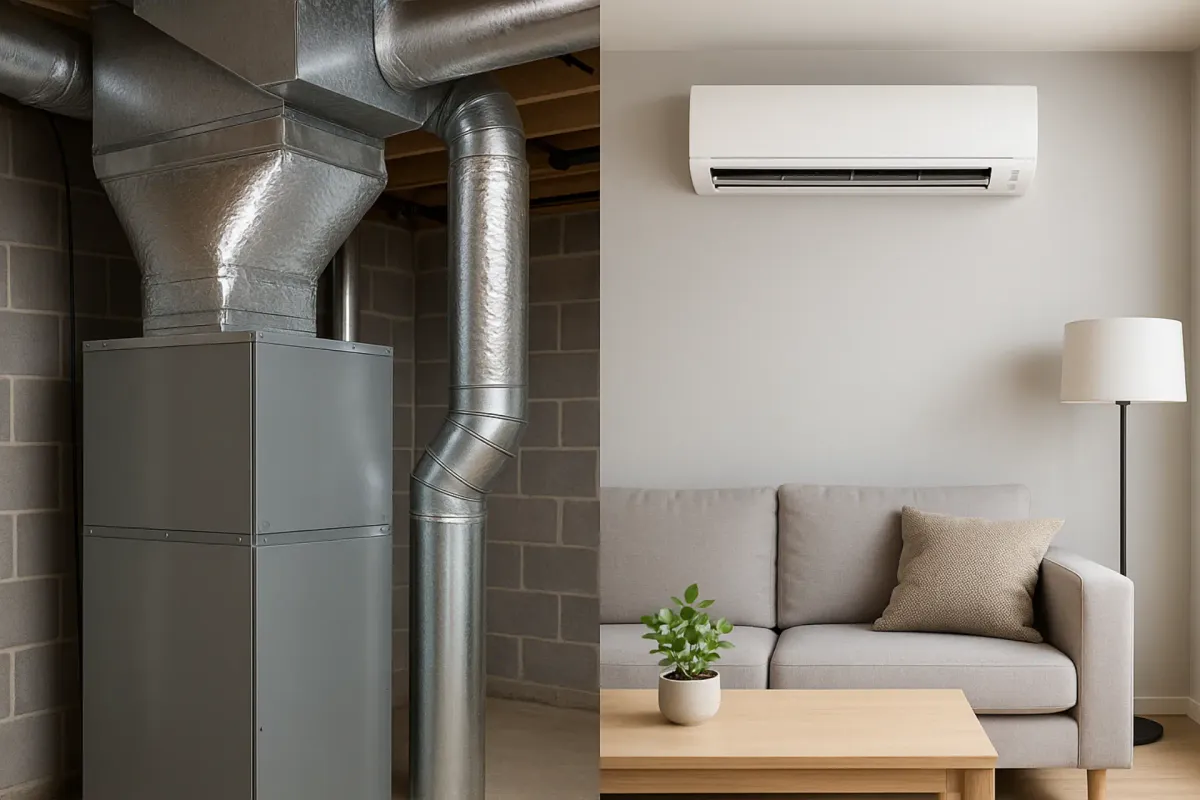
No Ductwork (and Can't Easily Add It)
These homes were designed around radiators and boilers. There are no duct chases, no return-air plenums, and no mechanical closets sized for an air handler. Adding ducts requires opening walls, building soffits, and sacrificing closet space — often at a cost of $8,000-$15,000 on top of the heat pump itself.
Historic Preservation Constraints
Many old New England homes are in historic districts or on the National Register. Local historic commissions may restrict exterior modifications including outdoor unit placement, line set routing, and even the appearance of line covers on exterior walls. Getting approval can add 2-8 weeks to your timeline.
Room-by-Room Temperature Differences
Irregular layouts, varying ceiling heights, uninsulated exterior walls on some sides, and rooms added over time create extreme temperature variation. A second-floor bedroom might be 78°F while the first-floor kitchen is 62°F. Zone-by-zone control is not a luxury — it is a necessity.
Top Ductless Brands for Cold-Climate Performance
Not all ductless heat pumps are created equal, especially when temperatures drop below 0°F. Standard mini-splits lose significant heating capacity below 15°F and most shut down entirely below 5°F. For a New England old home — where the heating load is already high and the structure loses heat rapidly — you need a cold-climate rated unit that delivers full (or near-full) capacity at sub-zero temperatures. Here are the four brands we recommend for old New England homes.
Best Overall
Mitsubishi Hyper-Heat FX
The most widely installed cold-climate mini-split in New England. The latest Hyper-Heat FX series operates down to -22°F with no electric backup — 9 degrees colder than the previous generation. Largest dealer network in NE means easy service. HSPF2 up to 12.4 makes it among the most efficient on the market.
Best Cold Performance
Fujitsu XLTH+
The XLTH+ (Extra Low Temperature Heating Plus) series now matches Mitsubishi at -22°F operating range. Achieves the highest HSPF2 rating of any cold-climate mini-split at 14.0, meaning lower electricity bills. Retains 70% capacity at -13°F. Slightly smaller dealer network than Mitsubishi, but excellent reliability.
Strong Mid-Range
Daikin Aurora
Daikin is the world’s largest HVAC manufacturer. The Aurora line is their cold-climate product for North America, rated to -13°F. Solid reliability and competitive pricing. Good choice when Mitsubishi or Fujitsu availability is limited. HSPF2 up to 11.0 with 60% capacity retention at -13°F.
Value Option
LG Red
The LG Red series offers cold-climate performance at the lowest price point of the four. Rated to -13°F with HSPF2 up to 10.5. Retains 55% capacity at -13°F. Smaller cold-climate track record in NE compared to Mitsubishi and Fujitsu, but growing rapidly. Best for budget-conscious projects.
Looking for full product rankings?
See our 8 Best Ductless Mini Splits 2026 guide for detailed reviews of every model, including head-to-head efficiency comparisons, noise ratings, and real-world performance data.
Cold-Climate Performance at Real New England Temperatures
Manufacturer spec sheets list a single HSPF2 number at 47°F — a temperature where any heat pump performs well. What actually matters for New England homeowners is performance at 17°F, 5°F, and -13°F. These are the temperatures your heat pump will encounter during January and February. The table below shows how each brand performs as temperatures drop, measured in both capacity retention (percentage of rated output) and COP (coefficient of performance, where higher means more efficient).
| Brand / Model | 47°F | 17°F | 5°F | -13°F |
|---|---|---|---|---|
| Mitsubishi Hyper-Heat FX | 100%HSPF2 12.4 | 85% | 76%COP 2.1 | 65%COP 1.8 |
| Fujitsu XLTH+ | 100%HSPF2 14.0 | 88% | 80%COP 2.3 | 70%COP 1.9 |
| Daikin Aurora | 100%HSPF2 11.0 | 82% | 72%COP 1.9 | 60%COP 1.7 |
| LG Red | 100%HSPF2 10.5 | 80% | 68%COP 1.8 | 55%COP 1.6 |
Capacity retention = percentage of rated heating output at that outdoor temperature. COP = coefficient of performance (watts of heat per watt of electricity). COP 2.0 means the unit produces 2x more heat energy than the electricity it consumes. Even at -13°F, all four brands significantly outperform electric resistance heating (COP 1.0).
The key takeaway: Fujitsu XLTH+ leads in both peak efficiency (HSPF2 14.0) and cold-weather capacity retention (70% at -13°F). Mitsubishi Hyper-Heat FX is close behind and has the strongest dealer network across New England. Both the FX and XLTH+ now operate down to -22°F, making them suitable for even the coldest Vermont and New Hampshire locations. Daikin Aurora and LG Red are solid choices that still dramatically outperform oil and gas heating, but they lose more capacity at the coldest temperatures.
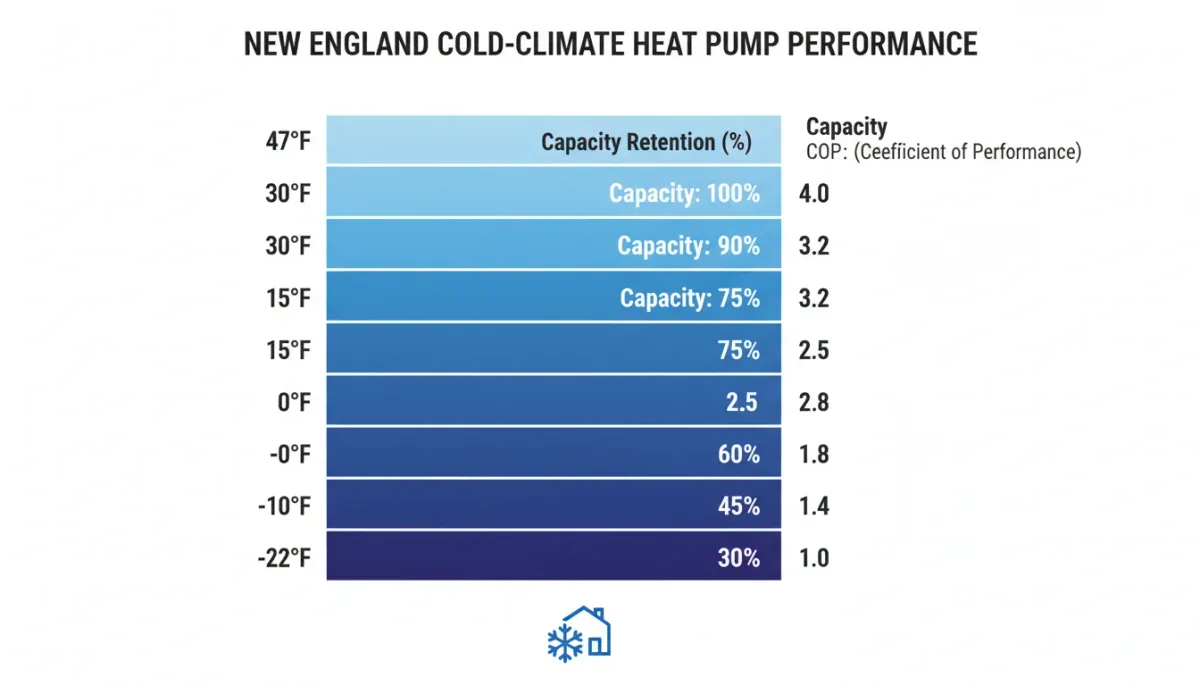
Cold-climate heat pump performance drops as temperatures fall, but modern units still deliver 55–70% of rated capacity at -13°F — far more efficient than electric resistance or oil heat.
System Design for Old Homes
Designing a ductless system for a pre-1950 home requires more thought than a modern home. You cannot simply count rooms and add heads. Each zone decision must account for the room's heat loss, its relationship to adjacent spaces, the structural constraints of old construction, and the homeowner's comfort priorities. Here is how we approach it.
Zone Planning
The goal is to identify which rooms need independent climate control and which rooms can share a zone. In an old home, bedrooms almost always need their own heads because of dramatic temperature differences between floors and between rooms facing different directions. Open-plan first floors (living room into dining room) can often share a single oversized head if the doorway between them is wide and always open.
Kitchens deserve careful attention. Old New England kitchens were often added as ells or extensions, poorly insulated and with lots of exterior wall area. They generate internal heat from cooking but lose heat rapidly through poorly insulated walls. A dedicated head for the kitchen is usually worthwhile in homes where the kitchen addition is thermally separated from the main structure.
Indoor Head Placement
In old homes with plaster walls, mounting a wall unit requires finding solid blocking behind the plaster. Wood lath behind plaster provides some support, but toggle bolts or backing plates are recommended for wall-mount units. Avoid mounting on interior plaster walls that separate from the studs — a common problem in 100-year-old homes where plaster keys have broken.
For rooms with high ceilings (10-12 feet, common in pre-1900 homes), mount the indoor head at standard height (7-8 feet) rather than at the ceiling. Mounting too high in a tall room directs heated air to the ceiling where it stratifies and wastes energy. Some installers default to ceiling height — insist on a lower mount in tall rooms.
Outdoor Unit Placement
Old homes often have limited side-yard space, and outdoor units need clearance from snow, ice, and dripping eaves. Place units on elevated platforms or wall brackets to keep them above snow accumulation. In New England, 18-24 inches of ground clearance is the minimum — 30 inches is better for heavy snow years. Avoid placing units under roof valleys or beneath areas where ice dams form. The dripping and refreezing cycle can encase the unit in ice, shutting it down.
Line Set Routing
Running refrigerant lines through old balloon-framed walls is challenging. The wall cavities are full of fire stops at random heights, old plumbing, and sometimes knob-and-tube wiring. Many installers route lines on the exterior using paintable line covers. For homes in historic districts, interior routing through closets, basements, and attic spaces is preferred to avoid visible exterior modifications.
Installation Challenges by Home Type
Every old New England home has its own personality, but they fall into recognizable archetypes. Each home type presents specific challenges for ductless heat pump installations. Knowing what to expect for your home type helps you plan better and ask the right questions when getting installer quotes.
1800s Cape Cod Challenges
The Cape Cod is the most common old home style in New England, and it presents a unique set of challenges for ductless installations. The classic 1.5-story design means the second floor has low ceiling heights where the roof slope meets the exterior walls, creating knee wall areas with as little as 3–4 feet of vertical space. These knee walls are typically uninsulated and act as massive heat sinks. Standard wall-mount mini-split heads need at least 7 feet of wall height, which is often unavailable in second-floor bedrooms.
The steep, narrow stairs typical of Cape Cod homes limit access to the second floor for equipment and materials. Attic access is often through a small hatch rather than a pull-down stair, making concealed duct installation in the attic space more labor-intensive. Plaster walls in the 1.5-story design are notoriously difficult to insulate without tearing them out entirely, because the wall cavities are shallow and irregular where they follow the roof slope.
Installer Tip: Floor-mount (console) units work exceptionally well under knee walls where wall space is too short for standard wall-mount heads. They sit on the floor against the short knee wall and direct warm air across the room. For second-floor areas with cathedral ceilings (where the previous owner removed the knee wall), concealed duct units installed in a closet or soffit provide even distribution without taking up any wall space.
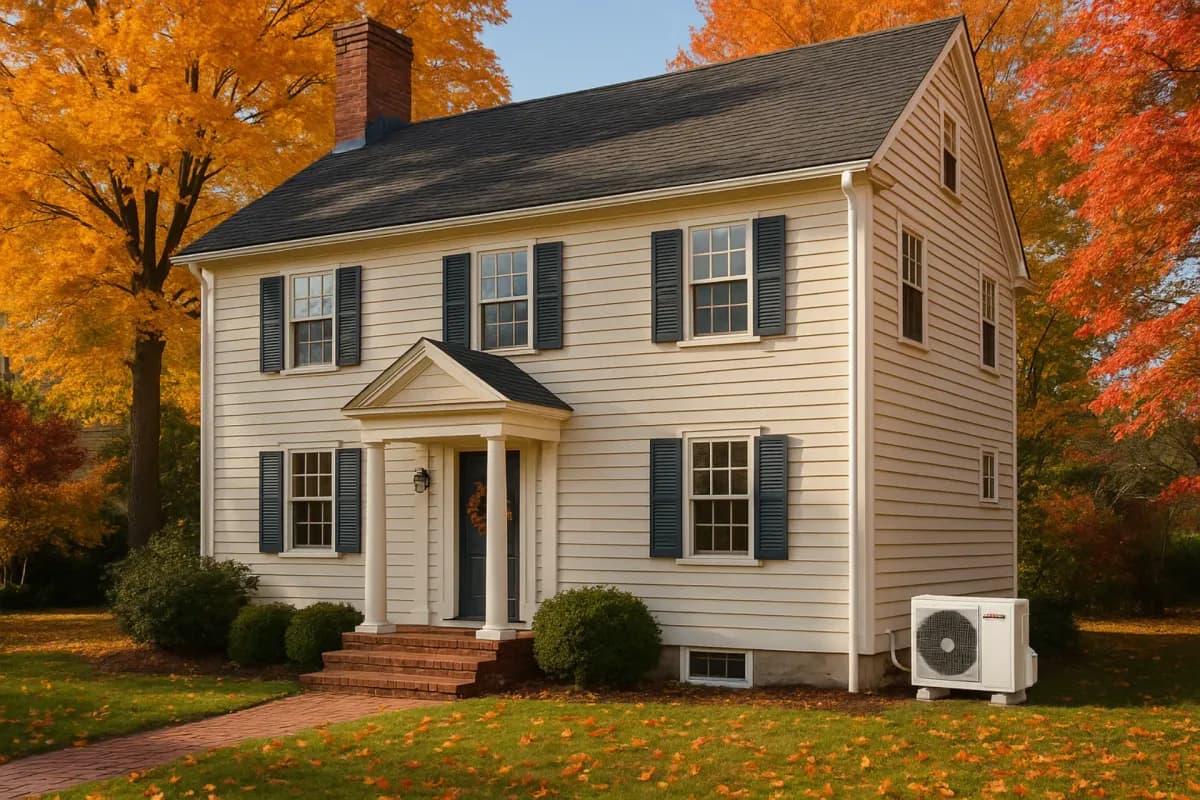
Colonial Considerations
New England Colonials — the quintessential two-story, center-chimney homes built from the 1700s through the early 1900s — have their own ductless installation challenges. First-floor ceilings are often 9–10 feet tall, sometimes higher in formal parlors. This height creates heat stratification: warm air rises and collects at the ceiling while the living space at floor level stays cold. Wall-mount heads mounted at 7–8 feet in a 10-foot room leave a 2–3 foot warm air pocket above them that contributes nothing to comfort.
The center chimney — a defining feature of classic New England Colonials — blocks the most natural refrigerant line routing path from basement to second floor through the center of the house. Installers must route around the massive brick chimney structure, adding complexity and line length. Multiple small rooms separated by doors (parlor, keeping room, dining room, study) each need individual heads because closed doors prevent air circulation between zones. Historic molding, chair rails, and crown trim on every wall in formal rooms make head placement aesthetically sensitive — homeowners rightfully do not want a plastic wall unit next to their 200-year-old hand-carved mantelpiece.
Installer Tip:Fan-coil (ducted) systems work well for Colonials that have a central closet or utility space on each floor. A single slim concealed duct unit installed in a closet can serve 2–3 adjacent rooms through short duct runs, eliminating the need for visible wall-mount heads in historically sensitive spaces. This approach reduces the number of indoor units while maintaining zone control.
Replacing Single-Pipe Steam
Many pre-1930 New England homes still operate on their original single-pipe steam heating systems. These cast-iron radiator and steam boiler systems are astonishingly durable — some have run continuously for over 100 years. But they are also wildly inefficient (60–70% AFUE for older boilers) and expensive to maintain as steam specialists retire and replacement parts become scarce. The good news: ductless mini-splits complement existing steam systems perfectly during a phased transition.
The best approach is to install mini-split heads in the most-used rooms first (primary bedroom, living room, kitchen) while keeping the steam boiler operational as your base-load heating system. The mini-splits handle the rooms you occupy most, providing precise temperature control and dramatically reducing boiler run time. Over the course of 2–3 heating seasons, you can add heads to remaining rooms until you have a full 5–6 zone system capable of replacing the steam boiler entirely. This phased approach spreads the cost over multiple years and lets you verify performance before committing to full replacement.
Installer Tip:Do not remove your cast-iron radiators immediately, even after installing a full mini-split system. Radiators serve as emergency backup heat during extended power outages (if you have a generator that can run the boiler) and during the extremely rare scenario where a mini-split outdoor unit fails mid-winter and requires parts ordering. Once you have completed two full heating seasons on the mini-splits, you can decide whether to decommission the boiler and remove the radiators — or keep them as insurance.
Refrigerant Line Routing in Old Homes
How you route refrigerant lines from the outdoor condenser to each indoor head is often the most challenging aspect of installing a ductless system in an old home. Modern homes have open wall cavities, accessible attics, and standardized framing that makes line routing straightforward. Old homes have none of these advantages. Here are the four primary routing strategies, ranked by preference.
Attic Routing
Best for: Cape Cods with accessible attics
Lines enter from the outdoor unit through a rim joist or gable end, run horizontally through the attic, and drop down through interior walls to each head. Completely hidden from view. Requires attic access and enough clearance to work. Best option when available.
Basement Routing
Best for: Colonials with full basements
Lines enter through the basement wall, run along floor joists overhead, and rise up through interior walls or closets to each floor. Works well for first-floor heads. Second-floor heads require vertical chases through closets or walls. Preferred for Colonials.
Exterior Chase
Best for: Homes without interior routing options
Lines run on the exterior of the house inside paintable plastic line covers. Visually noticeable but functional. Line covers can be color-matched to clapboard or trim. Requires historic commission approval in designated districts. Quick to install.
Through-Closet Routing
Best for: Multi-story homes with stacked closets
Lines rise vertically through closet stacks from floor to floor, using the back corner of each closet as a vertical chase. Minimal visual impact since lines are hidden behind hanging clothes. Works when closets align vertically between floors.
Historic district considerations:If your home is in a locally designated historic district, interior routing (options 1, 2, and 4) is strongly preferred to avoid visible exterior modifications. Most historic commissions will approve exterior line covers on non-primary facades (rear and side walls not visible from the street), but approval can take 4–8 weeks. Filing early and including photographs of proposed routes from the street view significantly speeds up the approval process. Some commissions have pre-approved heat pump installations as "routine maintenance" — check with your local commission before assuming you need a full hearing.
From the NuWatt Install Team
Old Homes Are Our Favorite Projects
With 8+ years of installing ductless systems across New England, we have learned that old homes are our favorite projects. The challenges are real — balloon framing, plaster walls, historic restrictions — but the results are transformative. We have retrofitted 200+ pre-1950 homes and the savings consistently exceed expectations, especially for oil-to-heat-pump conversions. A typical 2,000-sqft Colonial switching from oil heat sees $2,500–$3,500 in annual fuel savings, and the room-by-room comfort improvement is something homeowners tell us about for years afterward. If you have an old New England home, we would love to design a system for it.
The Air Sealing Question
The single most common question homeowners ask when converting an old home to heat pumps is: "Should I insulate and air seal first?" The answer is nuanced.
The Short Answer: Yes, But Don't Wait for Perfection
Address the biggest air leaks first: attic bypasses, basement rim joists, and gaps around plumbing and wiring penetrations. These represent 60-70% of a typical old home's air leakage and can be sealed for $1,500-$3,000. Then install the heat pump. You do notneed to fully insulate every wall, replace every window, and achieve a perfect blower-door score before installing a heat pump. That "perfect first" approach costs $20,000-$40,000 and delays the project indefinitely.
The practical approach is to size the heat pump for the home as it is today (with its current leakage), seal the major air leaks, and install the system. As you improve the envelope over time (adding insulation, replacing windows), your heat pump will simply run less and cost less to operate. Modern inverter-driven heat pumps modulate their output continuously — they naturally adapt to a tighter envelope by running at lower speed and using less electricity.
Mass Save, Efficiency Maine, Energize CT, and other state programs offer free home energy assessments that identify the biggest air leakage points. Many programs also offer free or subsidized air sealing as part of the assessment. Always schedule the energy assessment before your heat pump installation so you can address major leaks first and get an accurate picture of your heating load.
Working with Historic Commissions
If your old home is in a locally designated historic district or is individually listed on the National Register of Historic Places, you may need approval from a historic commission before installing exterior-visible equipment. Here is how to navigate the process.
Use slim duct (concealed) indoor units
Slim duct units hide inside closets, soffits, or ceiling cavities. No visible wall-mounted heads on the interior. Commissions love invisible solutions.
Mount outdoor units on rear or side elevations
Place the outdoor condenser where it cannot be seen from the public right-of-way. Most commissions only regulate primary (street-facing) facades.
Paint line covers to match siding
Paintable plastic line covers can be color-matched to your clapboard or trim color. This dramatically reduces visual impact and satisfies most commissions.
Route lines through interior paths
Run refrigerant lines through the basement, up interior walls or closets, and into the attic. This avoids any exterior penetrations on the primary facade.
Use lattice or shrub screening
Screen outdoor units with lattice panels or shrub plantings. Maintain at least 12 inches of clearance on all sides for airflow.
File early and include photos
Submit your application early with photos showing proposed placement, sight-line analysis from the street, and product cut sheets. Thoroughness accelerates approval.
Cost Examples by Home Type
The following scenarios represent the three most common old home types we see in our New England service area. Prices include equipment, installation, permits, and standard electrical work. They do not include air sealing, insulation upgrades, or knob-and-tube rewiring, which are separate projects. All prices reflect 2026 pricing with no federal tax credit (25C is expired).
2-zone system
1,400 sqft Cape Cod
1 head in downstairs living area + 1 head in upstairs bedroom. Single outdoor unit.
4-zone system
2,200 sqft Colonial
2 heads on first floor (living + kitchen) + 2 heads on second floor (primary + secondary bedroom). One or two outdoor units.
5-zone system
3,000 sqft Victorian
2 heads on first floor + 2 heads on second floor + 1 head in third-floor attic bedroom. Two outdoor units (split capacity).
Get a Quote for Your Old Home
NuWatt specializes in retrofitting old New England homes. We handle the engineering, historic commission approvals, and all rebate paperwork.
State Rebates for Old Home Conversions
With the federal Section 25C tax credit expired, state rebates are the only significant financial incentive for residential heat pump installations. The good news: several New England states offer especially strong rebates, and some have enhanced incentives specifically for older homes or oil-to-heat-pump conversions. Many states offer enhanced rebate tiers for income-eligible households that can significantly reduce costs further.
Mass Save
Massachusetts
Up to $8,500
Whole-Home tier: $2,650/ton capped at $8,500. Up to $9,500 with sizing + weatherization bonuses. Available to all ratepayers. Enhanced tiers available for income-eligible households. Includes free home energy assessment.
Energize CT
Connecticut
Up to $2,250
$750 per indoor unit, max 3 units ($2,250). Additional incentives for income-qualified households. Free home energy audit included.
Clean Heat RI
Rhode Island
Up to $11,500
The most generous program in New England. Up to $11,500 for whole-home conversion from fossil fuels. Income-enhanced tiers available.
NHSaves
New Hampshire
$250/ton (up to $1,250)
Standard rebate $250/ton for oil/gas/propane switch (5-ton cap = $1,250 max). Enhanced rebate $1,250/ton for electric resistance replacement (up to $6,250, pre-verification required). R-32/R-454B refrigerant required. Utilities: Eversource, Liberty, Unitil, NHEC. Install deadline Dec 30, 2026.
Efficiency Vermont
Vermont
Up to $5,000
Up to $5,000 for cold-climate heat pumps with ENERGY STAR certification. Enhanced rebates for income-qualified households.
Efficiency Maine
Maine
Up to $8,000
Up to $8,000 for income-eligible households. Standard rebates of $2,000-$4,000 for all homeowners. Strong focus on oil displacement.
Common Mistakes with Old Home Heat Pump Projects
Sizing for the house as if it were well-insulated
Old homes lose far more heat than modern homes. Using rule-of-thumb sizing (1 ton per 600 sqft) will leave you cold in January. Always insist on a Manual J calculation.
Not choosing cold-climate rated equipment
A standard mini-split loses 50-70% of capacity below 15°F. You need Hyper-Heat, XLTH, or equivalent cold-climate models rated to at least -13°F for New England.
Removing the existing boiler before the first winter
Keep your backup heating system for the first heating season. Verify the heat pump handles your coldest days before decommissioning oil or gas equipment.
Mounting outdoor units at grade level
New England gets 3-5 feet of snow. A ground-level outdoor unit will be buried, blocked, and damaged. Mount on wall brackets or elevated platforms at least 18-24 inches above max snow line.
Ignoring electrical panel capacity
Old homes often have 100-amp or even 60-amp electrical panels. A multi-zone heat pump system may require a panel upgrade ($2,000-$4,000). Check panel capacity before signing a contract.
Skipping the energy assessment
Every New England state offers free home energy assessments. The assessment identifies air leaks, insulation gaps, and electrical concerns — and often includes free air sealing worth $1,000-$2,000.
Old New England homes are some of the most rewarding heat pump projects we do at NuWatt. The energy savings are dramatic — many homeowners switching from oil heat save $2,000-$4,500 per year — and the comfort improvement is transformative. Rooms that were always too cold or too hot finally become comfortable year-round. The key is working with an installer who understands the unique challenges of old construction: proper sizing, cold-climate equipment, careful line routing, and phased envelope improvements.
With state rebates still strong across New England, the economics remain favorable even without the expired federal tax credit. A well-designed ductless system in an old home typically pays for itself in 4-7 years through fuel savings alone — and delivers both heating and air conditioning from day one.
Free Old Home Assessment
NuWatt specializes in pre-1950 homes across New England. We handle Manual J calculations, historic commission approvals, and all rebate paperwork. Get a free assessment today.
Frequently Asked Questions
Can I install a ductless heat pump in a 200-year-old home?▼
How many mini-split heads do I need for an old Colonial?▼
What is the best ductless heat pump for -20°F weather?▼
Can I keep my steam radiators after installing mini-splits?▼
Continue Reading
Heat Pumps for Older Homes (Pre-1950): Upgrade Sequence That Works
The correct upgrade sequence for older homes is: air seal first, insulate second, then install the heat pump. Skipping air sealing means your heat pump is sized for a leaky house, costing you thousands in oversized equipment and wasted energy.
Ducted vs Ductless Heat Pumps: Manual J-Based Comparison by Home Type
Ducted heat pumps use existing ductwork and provide whole-home coverage from a single unit. Ductless mini-splits need no ducts and offer room-by-room control. The right choice depends on your home's existing infrastructure and layout.
Room-by-Room Comfort: Multi-Zone Ductless Design Mistakes to Avoid
The #1 multi-zone mistake is connecting too few indoor heads to an oversized outdoor unit. This causes short-cycling, poor humidity control, and energy waste. Each indoor head should be matched to the room's actual heating load.